AD5 – Plan & Set Up a Reflected Butterfly Affinity Designer
- 04.01.2023
- 52
Video Tutorials, Courses»Tutorials for Drawing and Painting
Published 1/2023
MP4 | Video: h264, 1280x720 | Audio: AAC, 44.1 KHz
Language: English | Size: 1.61 GB | Duration: 1h 19m
Create, Import, Add Textures to Your Assets, and Apply and Alter on Motifs
Create, Import, Add Textures to Your Assets, and Apply and Alter on Motifs
What you'll learn
• the planning stage – creating the sketch and importing it
• my step-by-step method for setting up the symmetrical reflection
• how to use clipping masks and groups
• color and design in Affinity Designer
Requirements
Suggested pre-requisite are classes 1-4 in this series
Description
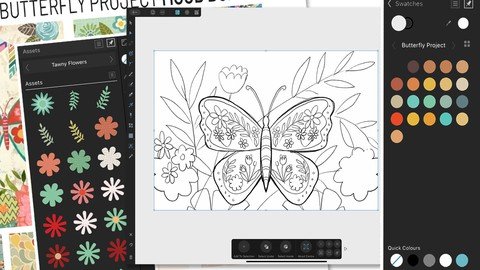
This class, Plan and Set Up a Reflected Butterfly Using a Symbol and Assets, is the 2nd in a 3-part series to show you how to create symmetrical reflections (5th in sequential order of all DeloresArt AD classes). We will create the reflection as a symbol and will adorn it with assets we have created and saved into our Asset Studio. As always, I will tie in a lot of tips and tricks to help you in your quest to learn all things Affinity Designer. The advantage is, by the end of the class, you will have a template to use for all future vertical symmetry illustrations. By the end of this class, you will have all the knowledge you need to fill out your design with your very own assets, readying them for the last class in the series. In that last class, we will add a ton of texture and anything else necessary to enhance the illustration.I take you step-by-step through the whole process from sketch to finished reflection. There is a lot to be learned about creating a complex illustration such as this, but you are ready for it!In this class I'll walk you through:the planning stage – creating the sketch and importing itmy step-by-step method for setting up the symmetrical reflectiontips for arranging the flowers attractivelyhow to use clipping masks and groupscolor and designAs we progress through this series of classes, you will learn more and more about this powerful software. This class will benefit anyone looking to add a vector program to their list of credentials.The key concepts I will include:methods to use symbols to create reflectionsdesign efficiencies to help you create in bulksteps necessary to complete a professional illustrationAffinity Designer is an excellent program for doing so many things, and this is just another examples of things you can do with it! Learning vector software workflows will increase your self-confidence in being able to work as a professional artist. You will learn everything necessary, incrementally.Intro to Plan and Set up a Reflected Butterfly in Affinity DesignerThis short intro will give you an overview of the class.Lesson 1: Inspiration, Reference and Mood BoardIn this lesson I will show you a ton of inspiration. I explain what style we are trying to achieve and introduce you to some wildly successful licensed artists.Lesson 2: Plan and Create the Rough SketchIn this lesson, I go through the entire process of sketching out the design I am planning. I show you how I use reference without copying it. I explain why I do sketches and how they improve design, over-all.Lesson 3: Refining and Cleaning the SketchI start this lesson by cleaning and refining my sketch. Then we will talk about importing colors that we will later use in our composition. I recommend an Application Palette as it will travel with the software and be available even with new documents. I share lots of other tips in this lesson.Lesson 4: The Reflection Template and Add TexturesWe will work through the process of creating the symbol which will become our reflection template. I give you plenty of advice for what works for me. We begin the process of adding texture to the parts of the motifs we create here.Lesson 5: Creating the Basic Butterfly ShapeThis is the lesson where we start to use our reflection template and block in the basic shape of the butterfly. I also show you a fun method for making the antennae. I share lots of tips and tips about Affinity Designer along the way.Lesson 6: Adding Details and Placing AssetsIn this lesson, I show you many alternate methods to add details. I place many of the assets I need to fill out my design, all the while explaining my rationale. I show you a few ideas I have.Lesson 7: Honing Placement and Altering of AssetsIn this lesson, we talk about perfecting the placement of assets. I speak to the instances where I might change an asset or create a new one. We are getting closer to the completion of the project, so design is the name of the game.Lesson 8: Creating the Background ElementsIn this lesson, I show you the entire process of creating my background elements. I speak to the layering as well and in the last lesson, we will move this below the butterfly. I show you things like grouping and adding to create single elements from leaves and stems, for example. This prepares us for the next class in the series where we will be adding texture.Lesson 9: Conclusion and Wrap UpWe will conclude everything about this stage of the design process in this lesson. I gift you a bit of a pep talk. I talk about what I think is so great about Affinity Designer and we end with a chat about next steps.Concepts covered:Concepts covered include but are not limited to the Affinity Designer Asset Studio, Affinity Designer Vector Persona, Affinity Designer Raster Persona, layering, Affinity Designer Symbol Studio, Affinity Designer Transform Studio, Affinity geometry and Boolean operations, Affinity Designer canvas settings, importing and applying textures, Affinity Designer composites, Affinity Designer Color Studio, Affinity Designer Transform Studio, shapes, color swatches and importing colors, texture fills, and much more.You will get.1 hour 22 minutes of direction from an instructor who has been in graphic design business and education for over 40 yearsknowledge of multiple ways to solve each design challengean outline in either Word format or a PDF version
Overview
Section 1: Introduction
Lecture 1 Inspiration, Reference and Mood Board
Lecture 2 Plan and Create the Rough Sketch
Lecture 3 Refining and Cleaning the Sketch
Lecture 4 The Reflection Template and Add Textures
Lecture 5 Creating the Basic Butterfly Shape
Lecture 6 Adding Details and Placing Assets
Lecture 7 Honing Placement and Altering of Assets
Lecture 8 Creating the Background Elements
Lecture 9 Conclusion and Wrap Up
Artists and designers wanting to learn more about vector drawing on the iPad
unknown https://www.udemy.com/course/ad5-plan-set-up-a-reflected-butterfly-affinity-designer/ ✓
Download From 1DL
DOWNLOAD FROM 1DL.NET
DOWNLOAD FROM 1DL.NET
Download ( Rapidgator )
DOWNLOAD FROM RAPIDGATOR.NET
DOWNLOAD FROM RAPIDGATOR.NET
Download (Uploadgig)
DOWNLOAD FROM UPLOADGIG.COM
DOWNLOAD FROM UPLOADGIG.COM
Please Help Me Click Connect Icon Below Here and Share News to Social Network | Thanks you !