Peekaboo Mixed Media Techniques W Procreate Brushes Included - Udemy
- 18.01.2023
- 28
Last updated 11/2021
MP4 | Video: h264, 1280x720 | Audio: AAC, 44.1 KHz
Language: English | Size: 1.89 GB | Duration: 1h 34m
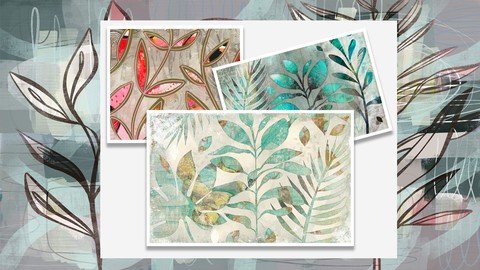
Negative Space Painting and 30 Free Brushes to Speed Up The Process
What you'll learn
Concepts include but are not limited to the clone tool in Procreate, seamless repeat pattern design, repeat patterns using the clone brush
Procreate layering, transparency, Procreate brush stamps, canvas settings, using the curves, Gradient Map, hue and saturation adjustments
Selecting and feathering, using liquify, snapping and guides, creating original textural brush stamps in Procreate
Adjusting Procreate brushes, sizing of documents and brushes, compositions with brush stamps, adding texture brush stamps, workflow/painting best practices
Requirements
No experience is necessary but basic knowledge of Procreate is an asset
Description
In this class we will be exploring mixed-media illustration in Procreate even more. We start by creating an interesting background in much the same way as you would do it in an art journal. We build it up, layer by layer, adding plenty of texture and interest. I show you many examples of work that I have been doing so you can begin to understand the outcomes. I add many different details like ephemera I have created or purchased. Throughout, I show you methods for creating depth with shadows.Another objective I had was in showing you how to make all sorts of adjustments, so there are many, many examples and walk-throughs of doing just that. We adjust things like hue and saturation, blending modes, and I show you tips and tricks with filters like liquefy and gradient map. With gradient map I show you how to remove color from an original watercolour to make a cool background.On the list of outcomes, I also include the skill of knowing when to use clipping masks and alpha lock to add details, and why these are so useful. Adding a certain amount of grunge is truly what makes mixed media art so satisfying and making and alpha lock make it so very easy.The last couple of lessons focus on fine-tuning and adding the little details that truly make this a traditional mixed-media piece. The last lesson shows a bunch of time-lapses (with narration, of course), that show all of the steps we went through in class in the several documents I worked on. It is really revealing!This is the 5th class in a series of classes in which I teach you all about mixed media and negative space painting techniques. I recommend that you take the time to work through all the classes if you are serious about mixed media. You will learn all there is to learn about making ephemera and texture brushes and working with these shapes, textures and finishes. Each class offers a different perspective. The other classes in the series are:· Ephemera to Make Brushes for Mixed Media Art in Procreate· Clone Tool for Constructing Seamless Repeat Patterns in Procreate· Serene Forest Watercolour Negative Space in Procreate· Jungle Fever Advanced Layering & Brush Methods in ProcreateIn this class I'll walk you through:· creating a mixed media background· adding ephemera including sourcing and importing· adding painted details and outlines· tips for creating compositions for a varied and appealing layout using the background brushesIf you're an eager mixed media artist hoping to switch to digital, and you have a good basic knowledge of Procreate, you'll be able to go through all the steps. This class will benefit anyone who is looking for attainable processes to spice up any layout or background.The key concepts I will include:· brush alterations and adjustments· working with negative space· layering to create interesting negative space techniques· approaches you can take in your creative workThis is an ideal class for you, even if you are not sure what you whether mixed media art is your thing. Many of these techniques are totally transferable to any art you produce. I guarantee you will create something really appealing, and it's so much fun once you get the hang of it!Intro to Peekaboo Mixed Media Compositions Using Simple TechniquesThis short intro will give you an over-all overview of the class.Lesson 1: Ideas to Spark CreativityIn this lesson, I will show you the objectives for class and explain the license item restrictions. We download a usable file into my Creative Cloud from on my desktop and I show you how ideal this is for then accessing the file on my iPad. I review all the originals we will use to create the repeat tiles from.Lesson 2: Setting Up Interesting Base LayersIn this lesson, I will break down the complete process of creating an interesting mixed media background in Procreate. I start by showing you many examples that I am working on. I show you the use of and the general build up and the interaction with the foreground layer.Lesson 3: Strategies for Foreground CompositionIn this lesson, we will look at creating the foreground, trying different strategies so that you get a look at what methods might suit your style.Lesson 4: Adding Interest to the ForegroundThis lesson is all about creating interest on what will be the foreground layer. I will show you a number of different ways to achieve this and by the end of the lesson, we actually have 2 usable layouts that are very different from each other.Lesson 5: Interesting Details for the BackgroundIn this lesson, you see me go through the process of creating an interesting mixed media background. These are realistic challenges which I work through as I try to add interest to the composition. I add many different details like ephemera and creating depth with shadows. I also show you the use of the gradient map to remove color from the original watercolour.Lesson 6: Experiments with AdjustmentsIn this lesson, I am making the fine-tune adjustments to perfect the look. I use many different strategies for this.Lesson 7: Last Minute Polishing and FinishingThis video is about adding little finishing touches to our compositions. We re-visit some of the inspiration, then I explain a few techniques for making changes and adding accents.Lesson 8: Finished Layout Examples and TimelapsesThis lesson is a look at the final art pieces that were created. I show you the Procreate Time-lapses that recorded every detail of my process. I narrate the entire process so you can see all the things I did "off camera"Lesson 9: Wrap up and ConclusionWe will conclude everything in this lesson. This is the last step, and in this lesson, I will be wrapping up.Concepts covered:Concepts include but are not limited to the clone tool in Procreate, seamless repeat pattern design, repeat patterns using the clone brush, layering, transparency, Procreate brush stamps, canvas settings, using the curves, Gradient Map, hue and saturation adjustments, selecting and feathering, using liquify, snapping and guides, creating original textural brush stamps in Procreate, the Brush Studio in Procreate, adjusting Procreate brushes, sizing of documents and brushes, compositions with brush stamps, adding texture brush stamps, workflow best practices, painting best practice, Procreate composites, techniques with paints and blending, and much more.You will get the bonus of.· 1 hour and 20 minutes of direction from an instructor who has been in graphic design business and education for over 40 years· knowledge of multiple ways to solve each design challenge· an outline with links to further research· a list of helpful online sites to further your education into surface pattern designProject Description:Today's challenge is to create a mixed media illustration using the techniques suggested in class. I have provided you with several brush sets you can use to accomplish this. I have included the fern and leaf brushes you can use for your initial silhouette, or you can just paint one freehand using something like a monoline brush. I have included a paper textures document that measures approximately 8x10 at 244 ppi. This has a built in watercolour texture and a few overlays which will react to whatever you paint on layers beneath it. The textures have blending modes pre-set, and you can experiment with those or with changing to another mode. Once you import the paper into your gallery, I suggest you duplicate it for use, therefore saving you the trouble of uploading it again for next time. Try to create at least one brush, and experiment with changing settings on the brushes provided. Once complete, try using the brush on your composition and then showing it here along with your finished art. Have fun!
Overview
Section 1: Introduction
Lecture 1 Lesson 2: Setting Up Interesting Base Layers
Lecture 2 Introduction
Lecture 3 Lesson 1: Inspirations and ideas to Spark Creativity
Lecture 4 Lesson 2:Setting Up Interesting Base Layers
Lecture 5 Lesson 3:Strategies for Foreground Composition
Lecture 6 Lesson 4
Lecture 7 Lesson 5
Lecture 8 Lesson 6
Lecture 9 Lesson 7
Lecture 10 Lesson 8
Lecture 11 Lesson 9: Conclusion and Wrap Up
Procreate users looking to work with mixed media techniques including making ephemera brushes,Professionals and hobbyists alike looking for a challenge in Procreate
Homepage
https://www.udemy.com/course/peekaboo-mixed-media-techniques-w-procreate-brushes-included/Fikper
lggkj.Peekaboo.Mixed.Media.Techniques.W.Procreate.Brushes.Included.part1.rar.html
lggkj.Peekaboo.Mixed.Media.Techniques.W.Procreate.Brushes.Included.part2.rar.html
Rapidgator
lggkj.Peekaboo.Mixed.Media.Techniques.W.Procreate.Brushes.Included.part1.rar.html
lggkj.Peekaboo.Mixed.Media.Techniques.W.Procreate.Brushes.Included.part2.rar.html
Uploadgig
lggkj.Peekaboo.Mixed.Media.Techniques.W.Procreate.Brushes.Included.part1.rar
lggkj.Peekaboo.Mixed.Media.Techniques.W.Procreate.Brushes.Included.part2.rar
NitroFlare
lggkj.Peekaboo.Mixed.Media.Techniques.W.Procreate.Brushes.Included.part1.rar
lggkj.Peekaboo.Mixed.Media.Techniques.W.Procreate.Brushes.Included.part2.rar
Please Help Me Click Connect Icon Below Here and Share News to Social Network | Thanks you !